- Published on
Tkinter Grid Tutorial - GUI with Python
- Authors

- Name
- jvip
- @PythonRoadmap
Table of Contents
In this blog, we will learn about Tkinter's grid, and how to use it to arrange widgets (GUI elements) on a tkinter window.
Introduction to Grid System
Tkinter has support for various "Geometry Managers", i.e. systems that allow you to position your widgets. In this tutorial, we will be discussing one such system, i.e. "Grid" geometry manager. If you are familiar with CSS grids, you will find it very easy to picture and understand Tkinter grid as well. Let's get started.
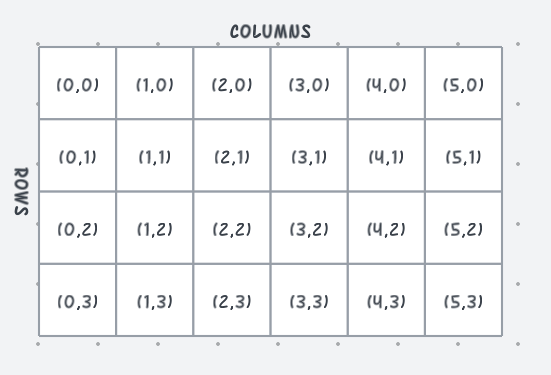
We can picture grid as a tabular structure, where we have rows and columns. We can then place the widgets in different cells, spanning multiple rows or columns as well. This allows us to accurately and conveniently place our widgets without worrying to much about the pixels and coordinates.
Tkinter Grid Example
Let's see with an example, create a new python file main.py and write the following code to initialize a tkinter object and placing some widgets via the grid system.
  import tkinter as tk
  window = tk.Tk()
  window.title("Python Grid Example")
  window.geometry("480x360") # Set the window size

  # Create some placeholder labels (widgets)
  text1 = tk.Label(window, text="Label 1")
  text2 = tk.Label(window, text="Label 2")
  text3 = tk.Label(window, text="Label 3")
  text4 = tk.Label(window, text="Label 4")

  # Place widgets in the grid using tkinter's grid manager
  text1.grid(row=0, column=0)
  text2.grid(row=1, column=0)
  text3.grid(row=0, column=1)
  text4.grid(row=1, column=1)

  # Start tkinter
  window.mainloop()
Run the code, by running command python main.py. A tkinter window will open up with output like this :
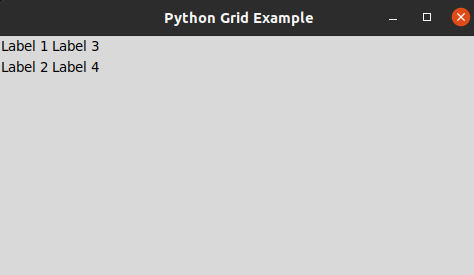
Here you can see the text1 widget is placed at 0,0 position cell, while the text4 widget is placed at 1,1 position cell.
Spanning rows and columns
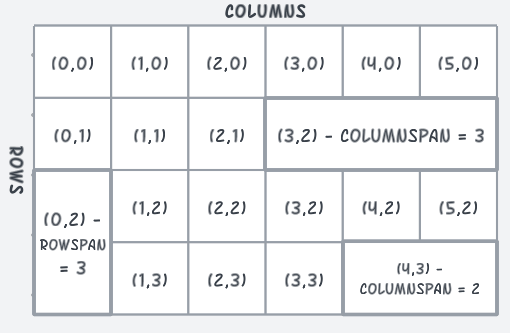
Tkinter's Grid system also supports spanning. Spanning allows a widget to occupy(span) multiple cells in rows and/or columns. This is really useful when you want your widget to have height or width of multiple rows or columns. Grid Spanning works similar to how merging cells work in Spreadsheets.
Grid has two types of spanning :
- Row Spanning
- Column Spanning
You can use both in conjunction as well. Let's see with examples :
Grid Column Spanning Example
We can span a widget to multiple adjacent columns in grid layout. This is done using the columnspan attribute.
Create a new python file main_colspan.py and write the following code :
  import tkinter as tk
  window = tk.Tk()
  window.title("Grid Column Spanning")
  window.geometry("480x360") # Set the window size

  # Create some placeholder labels (widgets)
  text1 = tk.Label(window, text="Label 1")
  text2 = tk.Label(window, text="Label 2")
  text3 = tk.Label(window, text="Label 3")
  text4 = tk.Label(window, text="Label 4")

  # Place widgets in the grid using tkinter's grid manager
  text1.grid(row=0, column=0)
  text2.grid(row=1, column=0, columnspan=2)
  text3.grid(row=0, column=1)

  # Start tkinter
  window.mainloop()
Run the code, by running command python main.py. A tkinter window will open up with output like this :
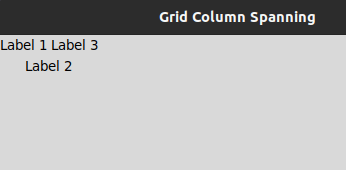
Here you can see the text2 widget has spanned two columns in this case. This makes the text2 widget occupy the space of two adjacent cells.
Grid Row Spanning Example
We can span a widget to multiple adjacent rows in grid layout. This is done using the rowspan attribute.
Create a new python file main_rowspan.py and write the following code :
  import tkinter as tk
  window = tk.Tk()
  window.title("Grid Row Spanning")
  window.geometry("480x360") # Set the window size

  # Create some placeholder labels (widgets)
  text1 = tk.Label(window, text="Label 1")
  text2 = tk.Label(window, text="Label 2")
  text3 = tk.Label(window, text="Label 3")
  text4 = tk.Label(window, text="Label 4")

  # Place widgets in the grid using tkinter's grid manager
  text1.grid(row=0, column=0)
  text2.grid(row=1, column=0)
  text3.grid(row=0, column=1, rowspan=2)

  # Start tkinter
  window.mainloop()
Run the code, by running command python main.py. A tkinter window will open up with output like this :
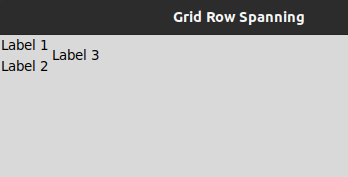
Here you can see the text3 widget has spanned two rows in this case.
Conclusion
This post is part of a series of posts that will explain how to use Tkinter in Python GUI Programming. We gave you few examples on how to use Grid system, how to span between cells etc.
If you love this small tutorial, please give us a share or follow on Twitter.
