- Published on
Tkinter Button Tutorial - GUI with Python
- Authors

- Name
- jvip
- @PythonRoadmap
Buttons are a fundamental component of any GUI application, in this blog we will learn about Tkinter's Button widget.
Introduction to Button Widget
Tkinter has built-in support for Button widget. A Button widget is a clickable item, that can display text in one or multiple lines. You can bind a python function to a Button widget, which will be automatically called whenever the button is clicked.
Buttons are used to implement or trigger certain methods when a user clicks on it. Buttons are one of the most used widgets in Tkinter or any GUI application development library.
Tkinter Button Example
Let's see with an example, create a new python file main.py and write the following code :
import tkinter as tk

def callback_function():
    print("Button Clicked!")

window = tk.Tk()
window.title("Tkinter Button Example")

button = tk.Button(window, text="Click Me!", command=callback_function)
button.pack()

window.mainloop()
Here is what we did in the code :
- We imported tkinter library.
- We added a python function
callback_function, this will called whenever the button is clicked. - We initialized a Tkinter window, and set the title to "Tkinter Button Example". This will be visible on our GUI application's window.
- We then created a Button widget by initializing
Buttonclass.- We passed the
textargument "Click Me!", this will be the text visible on button. - We set the
commandargument tocallback_function, using this we binded our callback function to this button.
- We passed the
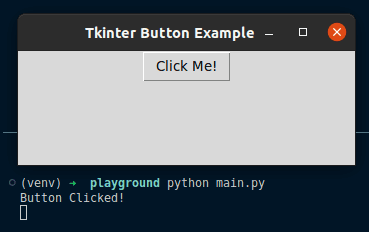
Let's run the code by running command python main.py. A tkinter window will open up with output like this :
Button States
Another important topic while working with Tkinter buttons is States. In Tkinter, you can disable clicks on a button by controlling it's state. A button has two states :
normalstate : Buttons are clickable, and can call the callback function assigned to the command argument.disabledstate : Buttons are not clickable and are grayed out. On clicking, the callback function is not triggered.
You can control the state of a button using the state() method on Button widget. Let's see that with an example :
import tkinter as tk

def button_click():
    label.config(text="Button Clicked!")

def disable_button():
    button.config(state=tk.DISABLED)

def enable_button():
    button.config(state=tk.NORMAL)

window = tk.Tk()
window.title("Tkinter Button States Example")

button = tk.Button(window, text="Click Me", command=button_click)
button.pack(pady=10)

disable_button_button = tk.Button(window, text="Disable Button", command=disable_button)
disable_button_button.pack()

enable_button_button = tk.Button(window, text="Enable Button", command=enable_button)
enable_button_button.pack()

label = tk.Label(window, text="")
label.pack(pady=10)

window.mainloop()
Here is what we did in the code :
We imported tkinter library.
We added 3 callback methods :
button_clickmethod : To print "Button clicked" message on GUI window.disable_buttonmethod : To disable thebuttonbuttonenable_buttonmethod : To enable thebuttonbutton
We initialized a Tkinter window, and set the title to "Tkinter Button States Example". This will be visible on our GUI application's window.
We then created 3 Button widgets, one for each callback methods
Let's run the code by running command python main.py. A tkinter window will open up with output like this :
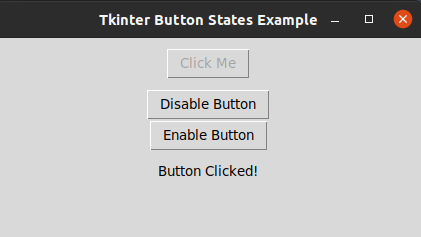
In the above screenshot, you can see that on clicking the "Disable Button", the button was grayed out and the state was changed to disabled.
Conclusion
This post is part of a series of posts that will explain how to use Tkinter in Python GUI Programming. We gave you few examples on how to use Button widget and it's state to create interactive GUI application.
If you love this small tutorial, please give us a share or follow on Twitter.
